


One man's trash is another man's treasure.
Or so my daughter said when she dragged home a thickly varnished table.
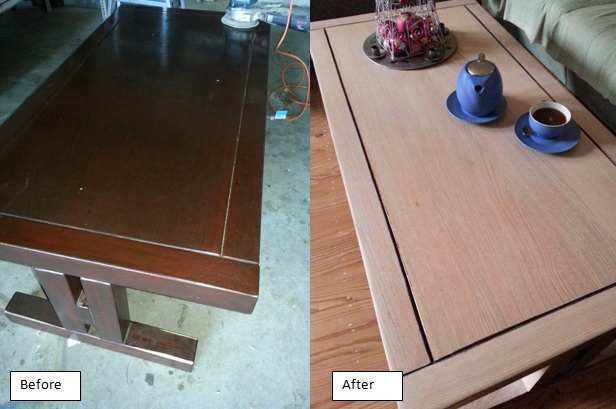
On closer inspection, it was found to be made out of solid hardwood. The size and shape was good but it was so heavily varnished and badly done at that!
There was no way that table was going to make it into the lounge room as it was, something had to be done and it was up to me to restore it. Part of it at least. It had too many fiddly bits that would have taken me too much time and effort to remove the varnish from. In the end, I decided on the top part of the legs. I would treat it with the white oil and leave the rest as dark brown as a contrast. Ok- here goes, the transformation begins!
Everything prepared- orbital sander, various papers, extension cord and the trusty vacuum cleaner!
I thought that by starting with 60 grit it would be enough but I had to find some 40 grit for it to even break the surface of the varnish and start seeing raw timber! This is going to take quite some time; and muscle! It really took much longer than anticipated to remove the varnish!
I wasn't after a pristine, new look so I was willing to leave some remnants of varnish in the grain. When finished, I was sure these would not be too visible. It took quite a bit of time and effort to remove the varnish before being able to see the timber. I then used the 60 grit paper to ensure a better finish. By jumping up too high e.g. 120 grit, it would make it extremely difficult to remove the scratches made by the 40 grit paper. The smaller the number, the deeper the scratches. With the 60 grit I could see the surface evening up and becoming smoother. I can also see the remaining varnish in some of the grooves, these will become less visible with the continual sanding.
After 60, I changed to 80 grit than 120 grit. The gradual sanding ensures smoother finish and ensures the previous scratches have been removed. This is especially important when one uses a stain as the pigments will settle in the scratches, highlighting them even more.
Because it was a hardwood with a darker undertone I decided to stop at 120 grit. It seems a bit rough for a table but there is a method to my madness, or so they say!
I vacuumed the surface, ensuring the pores are nice and open and then I saturated the surface with the kunos white oil. The weather was picture perfect and I left the oil on for 20 minutes. I could have left it on for a bit longer without the surface going tacky but there is only so much the timber will absorb. If it was hotter, I certainly would have only left if for 15 minutes before wipeing it off.
One can use various methods of application, depending on the project however with this table I found a cloth would be ideal. I wiped the oil off the surface with an absorbent rag and immediately dunked it in water. Rags used to wipe off any linseed oil product should be specially taken care off as they can self combust. The product naturally not. I was pleased with the result so far as enough pigments were tapped in the surface to give it a limed effect....so enough for today.
The next day, there seemed to be a bit of patchiness but I wasn’t concerned. The reason I had left it to 120 grit was that the Livos oils are penetrating oil and need to have the pores open for maximum penetration. Now I can prepare and continue with a second coat. I went over the surface with the orbital sander but this time I used a non abrasive pad. The idea is that this is it flattens the wax crystals in the oils giving more sheen level to the surface, making the surface more durable as well as giving the surface the finer “furniture feel”. If I sanded the yesterday to e.g. 400 grit prior to applying the oil, the pores would have been glazed over and little oil would have been absorbed. Whilst on some projects this would not be a major issue however on something like a table that will receive quite a bit of usage, then is would be most important. Now to apply the second oil, again, a cloth here is the best, left it on for 20 minutes and then wiped it off. There is only a very small difference in the colour intensity as the pigments settle and the second coat tops up the pores.
The next day, this being the third day I go through the same process again and go over with the orbital and polishing pad, dust the surface and this time I buff in a few drops of oil into the surface. If you are a bit heavy handed here, wipe off any excess. The surface should feel a bit greasy but not wet. After a stain, one can use the clear oil as well. At times this may help trap the pigments into the surface.
I left it in the garage for a few days before bringing it inside. Now it takes pride and joy in the middle of our lounge room.